A very common complaint in the polymer clay jewelry makers' world (and not only) is "I don't understand what is going on? I'm making tons of jewelry, I even lowered the prices a lot, and I still don't sell! Others sell like crazy and I don't understand why, my jewelry is so much better!"
Well, a lot of times it's not the exposure. It's not Etsy growing so big that you get lost in the crowd or - in the case of your own website - your website not getting enough exposure in google searches.
It's just the fact that you did not do a proper market research.
Art jewelry is beautiful, it's exquisite, unfortunately it doesn't sell well. If your goal is to make a living - more or less decent - from selling jewelry you make yourself, you have to really study your market potential. And take into consideration as well the fact that the market is practically inundated with cheap jewelry (from China or not)
Let's say you make gorgeous elven pendants or Goddess pendants. Who is going to wear those? You have two groups here: late teens-early 20s and the wider age range of the Pagan/agnostic community (or somewhere in between). Also, your jewelry will be worn on special occasions, not on an every day basis. Both of the groups your jewelry is addressing, as a majority, do not make a lot of money. So it is more likely that they'll prefer a cheap Chinese made knock-off of a movie fad something so they have money left to get some of that awesome blue hair dye or do their nails with rhinestones.
Or you make absolutely breathtaking big statement pieces that take a couple of days to make, are pure art, but they just sit there in your store and nobody buys them. Why? Because, unless you have Lady Gaga as your established client, your potential clientele is either young and as such doesn't have a lot of money to spare, or, if they're women in their 30s and 40s, unless they are a Mecena and like to encourage artists as a habit, they'll choose a statement piece from a well known artist, even if they pay 10 times the price of your piece. This is not to say that your piece is not as beautiful as the one of the established artist, but you're not known, and as such, can't yet be a "statement" subject in a conversation.
Should you stop making your pendants or statement pieces that you love so much? Definitely not. Just, you know, diversify a bit. How?
It will take a bit of work, and you'll have to do it periodically, every month or at least every 6 weeks, because the market changes a bit.
First, establish your demographics by buying capability. With the internet being so in-depth informative nowadays, it's not hard to find out which age range of the population generally makes more money. Don't go for the higher income - you don't offer what they're looking for. Go for the average income, especially blue and white collar professions and customer service. They need to look pretty on a daily basis, and after paying all the bills, have some left over that they can funnel in that direction.
Then get the latest color and shape trends of the season. Get into a few forums that might discuss fashion and the latest trends. Start creating from there.
Let's say, this spring The New York Trend forecasting talks about these colors.
What about the patterns forecast for Spring 2018? Simple, there are several websites that can give you that. If you look HERE, you will notice that you can make a lot of those pattern trends easily in polymer clay. If you make your jewelry in tone with the trend, it will sell better.
Give it some thought. Then maybe you'll want to revamp your whole approach to selling jewelry online.
Showing posts with label polymer clay jewelry. Show all posts
Showing posts with label polymer clay jewelry. Show all posts
Sunday, January 7, 2018
Tuesday, August 1, 2017
August 1st
One of my best friends posted today "August 1 may be the day of new searches. It's up to
us which road we'll follow. There's an old saying "measure
seven times, cut once", so it would be good if we think well what we say
and what we do."
It's the beginning of the end. Of summer, what did you think? The change of color in nature, we start seeing more yellow and rust and the fall flowers will start blooming soon. So probably our creations will slowly change color patterns. Did you notice that? If you go look at most artists' work, you will see the change, following the seasons. It's something that is in the subconscious.
Anyway. IF (and only IF) I manage to do a tutorial today it will be either a very short one (maybe the caterpillar?) or part 1 of the color theory tutorial, because it's mostly narrated and I decided to make it on the laptop, so I don't have to sit up in a chair while editing it.
But I have a fairly busy day - as usual, before noon, because I have to do as much as I can before the potential narcoleptic stage of my days kicks in.
Let me see:
1. get to the post office to mail the packages for the winners of the 1,000 subscribers contest (I know, it's been almost a couple of weeks, but budget)
2. get to Hobby Lobby - not just for buying the chain to finish the "clay with me" black and white piece but also it's a 30% off on polymer clay week so I have to take advantage of that.
3. a little grocery shopping - as I decided to go back on low carb diet for a while, just to make sure that it's not the carb thing that brought on these fatigue/narcolepsy spells. The three years I've been on low carb I felt so full of energy that I was really active despite the chronic pain issue. My body has been so messed up by chemo that it's very possible that is the culprit.
4. a few pieces that need sanded, varnished, put together.
So that's quite a bit of driving around, and because I can't take pain medicine and drive, it's quite a bit of driving around in pain. That makes me more tired than normal.
So that I do give you some useful information too, not just my daily woes.
Excellent information on what gauge of wire to use for what pieces of jewelry
Nice mokume gane tutorial in images. If you'd accept my color advice though: 1. the dark green I would use a 1:1 mix of jungle green and green Premo; 2 the lighter green I'd use the Wasabi Premo (or Souffle Pistacchio) 3. I'd only use one yellow, the Souffle canary (or a mix of 1:1 Premo white and yellow) 4. I would eliminate the silver/granite pearl completely. Try it
It's the beginning of the end. Of summer, what did you think? The change of color in nature, we start seeing more yellow and rust and the fall flowers will start blooming soon. So probably our creations will slowly change color patterns. Did you notice that? If you go look at most artists' work, you will see the change, following the seasons. It's something that is in the subconscious.
Anyway. IF (and only IF) I manage to do a tutorial today it will be either a very short one (maybe the caterpillar?) or part 1 of the color theory tutorial, because it's mostly narrated and I decided to make it on the laptop, so I don't have to sit up in a chair while editing it.
But I have a fairly busy day - as usual, before noon, because I have to do as much as I can before the potential narcoleptic stage of my days kicks in.
Let me see:
1. get to the post office to mail the packages for the winners of the 1,000 subscribers contest (I know, it's been almost a couple of weeks, but budget)
2. get to Hobby Lobby - not just for buying the chain to finish the "clay with me" black and white piece but also it's a 30% off on polymer clay week so I have to take advantage of that.
3. a little grocery shopping - as I decided to go back on low carb diet for a while, just to make sure that it's not the carb thing that brought on these fatigue/narcolepsy spells. The three years I've been on low carb I felt so full of energy that I was really active despite the chronic pain issue. My body has been so messed up by chemo that it's very possible that is the culprit.
4. a few pieces that need sanded, varnished, put together.
So that's quite a bit of driving around, and because I can't take pain medicine and drive, it's quite a bit of driving around in pain. That makes me more tired than normal.
So that I do give you some useful information too, not just my daily woes.
Excellent information on what gauge of wire to use for what pieces of jewelry
Nice mokume gane tutorial in images. If you'd accept my color advice though: 1. the dark green I would use a 1:1 mix of jungle green and green Premo; 2 the lighter green I'd use the Wasabi Premo (or Souffle Pistacchio) 3. I'd only use one yellow, the Souffle canary (or a mix of 1:1 Premo white and yellow) 4. I would eliminate the silver/granite pearl completely. Try it
Wednesday, June 21, 2017
New piece and still thinking about tutorial
I am sorry but I am not yet decided on today's tutorial. Might be the sculpted feather piece. It depends on how I'm going with the few pieces I'm working on, and i also need to go out and do some grocery shopping.
I managed to upload in the store one of the new pieces. Working on uploading stuff from the last few tutorials.
Anyway, here's the new piece. I'll make a separate post about the new tutorial.
Industrial Era necklace and bangle set

I managed to upload in the store one of the new pieces. Working on uploading stuff from the last few tutorials.
Anyway, here's the new piece. I'll make a separate post about the new tutorial.
Industrial Era necklace and bangle set

Tuesday, June 20, 2017
Saturday, June 3, 2017
3 hours
Yay. 3 hours. This is how long it's left on the first part of the patina jewelry set. But at least it will be uploaded today for sure. I will try to get the part 2 uploaded before evening as well. Because otherwise it won't get uploaded til Monday.
Tomorrow is Sunday and I have started the "clay with me Sunday" and I will be sticking to it. I am actually thinking of making a live thing starting next week. Announce what is needed 3-4 days in advance, then make an easy jewelry piece so people can actually really "clay with me" live. And who doesn't get to be online during the live event, the whole video gets automatically recorded and posted by Youtube.
What do you think? Would you like that?
9:50 am update
50% uploaded.
Time remaining: 2 hours 50 minutes. That makes this Saturday a record. The video is 25 minutes long. So it comes to an average of about 1 hour for each 4 minutes of video. Youtube. I'm at a loss of words.
4:20 pm, 39% of the part 2 is uplodaed. Youtube doesn't want to tell me at all how much time is left.
Tomorrow is Sunday and I have started the "clay with me Sunday" and I will be sticking to it. I am actually thinking of making a live thing starting next week. Announce what is needed 3-4 days in advance, then make an easy jewelry piece so people can actually really "clay with me" live. And who doesn't get to be online during the live event, the whole video gets automatically recorded and posted by Youtube.
What do you think? Would you like that?
9:50 am update
50% uploaded.
Time remaining: 2 hours 50 minutes. That makes this Saturday a record. The video is 25 minutes long. So it comes to an average of about 1 hour for each 4 minutes of video. Youtube. I'm at a loss of words.
4:20 pm, 39% of the part 2 is uplodaed. Youtube doesn't want to tell me at all how much time is left.
Sunday, May 21, 2017
Fire in the hole!
Just kidding.
I've been making torpedo beads all late evening. I love the effects I got on some of them.
Now what to do with them lol
Oh yes, and I don't have a bead maker, they're done by hand. I had (imagine that!) some scraps and did some damascus cane and other stuff then used it as veneer for these. If you're interested how to make them without a bead maker, just tell me.
Also I discovered something while making them. I'll have to replicate the effect and if it replicates, I'll make a tutorial about it.


I've been making torpedo beads all late evening. I love the effects I got on some of them.
Now what to do with them lol
Oh yes, and I don't have a bead maker, they're done by hand. I had (imagine that!) some scraps and did some damascus cane and other stuff then used it as veneer for these. If you're interested how to make them without a bead maker, just tell me.
Also I discovered something while making them. I'll have to replicate the effect and if it replicates, I'll make a tutorial about it.
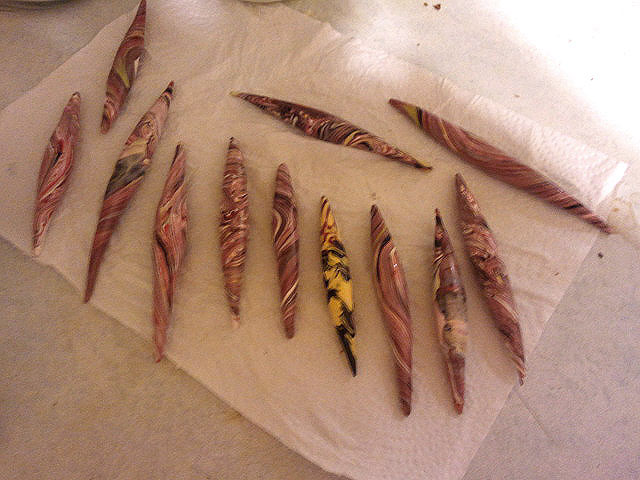 |
| Quite a crop huh |
 |
| that one in the middle |

 |
| looks like some kind of egg ready to hatch or something |


 |
| that yellow one looks like a geisha in a kimono |
Saturday, May 20, 2017
Hollow beads
Yes, yes, I know, I've been talking about the "dimension and distress" tutorial.
But, considering that it's chilly and the barometer still holds in areas that are uncomfortable for me so I'm still in quite a deal of pain, I might actually work on two tutorials today. I don't promise I'll post both of them today though.
I've been watching a number of tutorials on how to make hollow beads. And I think I can add my two cents to that, just a bit of knowledge that I got through experimentation and experience. Who knows, maybe some of you might enjoy it. How does "hollow pod with seed inside" sound?
Ok I'll start working on the "dimensions and distress" tutorial now. Probably show the technique on a couple tiles, a bead or two and a pendant.
Will update later during the day as usual.
12:10 (ish) update
Oh well. I did the hollow beads tutorial first. Just because the other one takes a while. You know me, I must have pieces already done, then pieces that are half done, before I start the tutorial. That, and the editing takes the longest.
OTOH, 1 hour 8 minutes upload duration for a little bit over 7 minutes video. I am seriously going to look for some solutions for that today. I found a couple open source converters and recorders that are special for streaming and live recording with optimization for the web. I guess we'll have to wait and see how they work. The Stormtrooper can take whatever I throw at it.
2 pm update. It's up.
2:50 update.
SCULPEY HAS A 40% OFF SALE!!!
https://www.sculpeyproducts.com/
But, considering that it's chilly and the barometer still holds in areas that are uncomfortable for me so I'm still in quite a deal of pain, I might actually work on two tutorials today. I don't promise I'll post both of them today though.
I've been watching a number of tutorials on how to make hollow beads. And I think I can add my two cents to that, just a bit of knowledge that I got through experimentation and experience. Who knows, maybe some of you might enjoy it. How does "hollow pod with seed inside" sound?
Ok I'll start working on the "dimensions and distress" tutorial now. Probably show the technique on a couple tiles, a bead or two and a pendant.
Will update later during the day as usual.
12:10 (ish) update
Oh well. I did the hollow beads tutorial first. Just because the other one takes a while. You know me, I must have pieces already done, then pieces that are half done, before I start the tutorial. That, and the editing takes the longest.
OTOH, 1 hour 8 minutes upload duration for a little bit over 7 minutes video. I am seriously going to look for some solutions for that today. I found a couple open source converters and recorders that are special for streaming and live recording with optimization for the web. I guess we'll have to wait and see how they work. The Stormtrooper can take whatever I throw at it.
2 pm update. It's up.
2:50 update.
SCULPEY HAS A 40% OFF SALE!!!
https://www.sculpeyproducts.com/
Wednesday, May 17, 2017
Sunny with dragonflies
Gods above and on Earth I'm tired.
I woke up a little after 2 am. Storms moving through. Very noisily. At least on my side of town there was no wind damage. Well, at my house. I didn't get out of the house today so I don't know about others, but the West and North sides of OKC had wind damage.
So I told myself "I'll take naps during the day". Well, I will. So there.
Until then though, I finished the "make a dragonfly necklace out of your scrap clay" tutorial. It's uploading now. But it's 42 minutes long. So... 4 hours, maybe?
Anyway. It looks good. I'll take a nap and then I'll work on the other one I have in mind. I intended to go get something but I decided it can wait. Until the week-end.
This is how the necklace came out:


Edit 12:15 pm
Youtube is sneaky. Now it doesn't say anymore how much time remaining for your video to upload. It only says the %. Because of course you might forget that you started the upload an hour ago and it's only gone to 20%. "Four hours? Us? Naaaaa! Here, look at this %! See how good we're doing?"
Edit 7 pm. It's finally up. I realized I did a little mess up and the eye cane section was repeating, I fixed it but it takes a while for youtube to process that (in case you were wondering)
Anyway, here it is
Edit 4:45 pm. It started showing time remaining. 2 more hours. I think I really need to divide any videos into 10-15 minutes at the most and just upload "part 1" "part 2" etc. This is ridiculous. Again it's youtube not me. It does seem to go faster at night, but I'm sorry, I am not going to leave the Starship trooper on for the night. Not so much about power consumption but about noisiness.
Now I feel like

I woke up a little after 2 am. Storms moving through. Very noisily. At least on my side of town there was no wind damage. Well, at my house. I didn't get out of the house today so I don't know about others, but the West and North sides of OKC had wind damage.
So I told myself "I'll take naps during the day". Well, I will. So there.
Until then though, I finished the "make a dragonfly necklace out of your scrap clay" tutorial. It's uploading now. But it's 42 minutes long. So... 4 hours, maybe?
Anyway. It looks good. I'll take a nap and then I'll work on the other one I have in mind. I intended to go get something but I decided it can wait. Until the week-end.
This is how the necklace came out:


Edit 12:15 pm
Youtube is sneaky. Now it doesn't say anymore how much time remaining for your video to upload. It only says the %. Because of course you might forget that you started the upload an hour ago and it's only gone to 20%. "Four hours? Us? Naaaaa! Here, look at this %! See how good we're doing?"
Edit 7 pm. It's finally up. I realized I did a little mess up and the eye cane section was repeating, I fixed it but it takes a while for youtube to process that (in case you were wondering)
Anyway, here it is
Edit 4:45 pm. It started showing time remaining. 2 more hours. I think I really need to divide any videos into 10-15 minutes at the most and just upload "part 1" "part 2" etc. This is ridiculous. Again it's youtube not me. It does seem to go faster at night, but I'm sorry, I am not going to leave the Starship trooper on for the night. Not so much about power consumption but about noisiness.
Now I feel like
Monday, May 15, 2017
European suppliers
I do quite often purchase things from Europe. And most of the time it may take just a day or two more for them to get here compared to purchasing US only. Yes, the shipping is a tad more - but not by much, and even so the prices are still lower than the US prices.
One of the stores I've discovered is in the Czech Republic. So many things I want to buy from that store that - can I win the lottery please? Look at all this stuff. Keep in mind that 100 CZK (Czech crowns) is just a tad over $4 (today it's $4.13 to be exact). No wonder European artists create so much more than us in the US of A or even Canada.
Nemravka store
One of the stores I've discovered is in the Czech Republic. So many things I want to buy from that store that - can I win the lottery please? Look at all this stuff. Keep in mind that 100 CZK (Czech crowns) is just a tad over $4 (today it's $4.13 to be exact). No wonder European artists create so much more than us in the US of A or even Canada.
Nemravka store


Sunday, May 14, 2017
The search for the perfect faux turquoise
Most of them involve breaking turquoise-colored clay in small pieces, then coating the pieces with various media in the black and gold colors, then pressing the pieces together to form a lump.
The resulting faux turquoise pieces look decent but still are not looking real enough. Mostly because:
1. the matrix in a turquoise is very very rarely black and
2. because very rarely actual gold coloring can be found in a turquoise - the stone takes its color from copper, and where there was too much copper it will have agglomerations of reddish, not gold-tinted mineral. The very very rare stones with real gold coloring are usually from deposits neighboring gold mines and the turquoise is tinted green not blue exactly because of the gold. So there is no real authentic blue turquoise with gold inclusions.
3. the black acrylic paint is too thin, the resulting pieces usually look like dyed howlite. So you'll imitate a faux turquoise. Making a faux faux turquoise. Heh. Seriously, the way you distinguish a howlite from a real turquoise: even color and even thickness lines. If you got both, it's howlite. If you have just one of the two, it's turquoise.
4. Buffing/varnishing too much. Turquoise is a soft stone. Normally, unless it's stabilized, it will not buff to a high shine. Very few turquoises are high grade enough to give a high shine. Also, varnishing the indented matrix. Huh?
When attempting to make a faux turquoise,there are a few things one has to take into consideration. The main one being: what type of turquoise are you attempting to replicate?
Here are a few tips.
1. Choose your main color of clay.
Fortunately there are shades of turquoise in all the polymer clay brands out there. When choosing the color, keep in mind that, except for very few mines, like the Sunnyside mine in northern Nevada, in all the other mines the extracted turquoise is a specific shade of color when it comes to turquoise blue. The green stones may have different shades, also because turquoise degrades easily, that is why most of the stones that are polished and set in jewelry are treated so they wouldn't degrade and change color. There are different hues of the same shade (not sure if I explain it right), but that is always in a type of gradient, you don't have usually one little nugget of one distinct hue next to another nugget of a completely different hue separated by a matrix line. There is some kind of transition and sometimes there are hues within hues. Thus you can't put a Fimo peppermint piece next to a Souffle robin's egg piece and expect for your stone to look realistic to someone who has seen a single turquoise in their life. The same, there are very few real turquoises that will have the same exact shade and hue all through the stone, without a single speck of difference. When they do, that's a dyed howlite.
 |
| the most known is the Royston turquoise, with a heavy matrix of various shades of ochre, brown, red and even grey. |
 |
| The Blue Diamond mine gives turquoises with a very heavy dark grey and sometimes even black (one of the few I was talking about) matrix. Also can have a lot of "dirty turquoise" stones. |
 |
| The Sleeping Beauty mine has given some of the most prized turquoises. Some almost pure, with barely or no matrix, and also the rarest of all, the white matrix. |
 |
| A few stones from the Damele mine, with perfect examples of not only green turquoise, but also of gold matrix in green turquoise, cloudy matrix and spiderweb matrix |
When several shades of blue or green distinctively separated can be noticed in the mineral, usually that is not pure turquoise, but a combination (chrysocolla) of turquoise with azurite and malachite, and sometimes even other minerals.
 |
| Gorgeous, isn't it? This is chrysocolla. It has azurite mixed in with the turquoise. When there is malachite too it's easier to identify because of the banding specific to malachite, but when it's azurite that is usually the only thing that will give it away, the different shades of blue in the same gem. That, and a weaker matrix. |
You can also make turquoise green, as stones from several mines are actually green not blue, like the ones found in Nevada - reason why they are called "Nevada Green Turquoise". Among the most famous mines for green turquoises are Blue Gem, Carico Lake, Battle Mountain and the Fox mine.
Carico Lake turquoise is famous for a special type of green turquoise that takes the color from a high zinc content, and they are described as "spring green" or "Irish green".
 |
| Carico Lake turquoise. Many shades can be found here and one of the few where you can see more than one shade of blue in a real turquoise. Beware of another trap though: do not confuse faustite with green turquoise!!! |
There is also fabulous caramel brown, red or yellow turquoise, like the one found in the Tortoise
mine in Nevada (where gorgeous variscite can be found too).
 |
| Various colors of turquoise from Tortoise mine. Also with the rarest of matrix webbing, the "water web" |
 |
| And... another trap. Enter the Variscite. Actually most of the stones pretended to be real white turquoises, if they're not dyed howlite, they're variscite. Variscite is very beautiful by itself though, do not think that it's not. But it would be easy to think you made a faux turquoise and... it looks like variscite but you don't know that. |
Some matrices may show as very fine lines (light matrix), but some have a more cloudy effect, like the Sleeping Beauty turquoises or can even have a very heavy matrix where the turquoise stone itself shows very little. Keep in mind that in the world of real gemstones, the less matrix on a turquoise (the cleaner the turquoise) the more precious it is - except for several varieties that are actually prized for the beauty of the matrix itself, like the turquoises found in the Morenci copper mine in SE Arizona, that have a highly prized brown matrix called "Morenci red matrix". There are two things to take into consideration when choosing the matrix type:
- - the clarity and definition of the lines (some matrices are "smoky" or "cloudy" while others form more defined lines) and the amount of matrix shown.
 |
| perfect example of "smoky" (cloudy) matrix. See how the lines between the matrix and the gem are blurred? |
 |
| Compare it with this one. See how well defined are the separation lines between the matrix and the gem? Still no straight lines though, and the thickness of the matrix line is randomly changing |
- The matrix in a turquoise can be spiderweb - running throughout all the stone, dividing it into smaller turquoise pieces; or "heavy", non-webbed, with large areas of matrix with interspersed actual turquoise pieces.
A few examples
 |
| spiderweb matrix (high grade) |
 |
| Compare it to this "boulder". Also, notice the flecks of copper. Copper, not gold. |
 |
| The famous Morenci matrix. Note the very light matrix (usually pyrite that can give it even a silver color). The interesting part about the Morenci stones is that they have a little transparency and also even if at first look the matrix line look well defined there is "smokiness" in the turquoise nugget. This one also has a "waterweb", notice the gradient at the edge of the blue areas. |
3. Decide on the transparency of the stone.
About half of the turquoise gems have some degree of transparency, and some of these are highly prized. The Candelaria turquoise for example, that used to be mined in the Candelaria Hills in Nevada. The Candelaria turquoise is one of the most highly prized turquoises due to its hardness, the translucent dark blue hue and the reddish brown spiderweb matrix.
Same goes for the Dry Creek or White Stallion turquoise, a variety that is almost white - actual turquoise not howlite, magnesite or calcite. Real white turquoise is extremely rare - like the one in White Owl mine. It's turquoise without copper in it.
 |
| Candelaria turquoise |
 |
| Dry Creek turquoise - notice what a light blue color |
 |
| White Stallion turquoise - almost white |
 |
| White Buffalo turquoise. Most true white turquoises are very soft, some of the ones mined at the White Buffalo mine are though hard enough to polish and set. |
As I said, gold is never found in natural turquoise. The closest metallic hue is a very light bronze. Most of the metallic inclusion areas will be of a reddish brown or golden brown. As color, matrices can be very varied: "black" - which is in fact various shades of grey. This type of matrix forms from iron sulfide/pyrite inclusions. what you see as really black matrices are in fact white matrices that have been dyed black. "Yellow" - which are in fact various shades of ochre. They are in fact rhyolite, a volcanic rock; turquoise usually forms in rock with a volcanic origin. And "brown" which is one of the around sixteen types of iron oxide known to form matrices in turquoise.
 |
| Kingman turquoise with ochre matrix |
 |
| Green Manassa turquoises with gold matrix |
 |
| Chinese turquoise with brown matrix |
 |
| Again the Blue Diamond turquoises as an example of natural "black" matrix |
 |
| The black matrix in this turquoise is black because the stone has been "stabilized", treated so it wouldn't degrade and change color, and so it would become harder (turquoise can be very soft sometimes). Also notice how the lines change thickness, which is the sign it's not howlite |
So I thought of making this blog entry in preparation for a tutorial I'm planning. Don't get me wrong, I am not trying to bash other artists or put them down, on the contrary, I think that some of them have achieve gorgeous results.
In fact, here are some tutorials that can be found on Youtube - and you'd better watch their other videos, as they have a plethora of useful information if you want to get into polymer clay sculpting.
To be noted is the fact that all these tutorials are based on Victoria (Tory) Hughes technique for faux turquoise as she presented it in her "Polymer-the Chameleon clay) book. The technique involves breaking up turquoise colored polymer clay, mixing black acrylic paint in it, then squeezing it into beads/cabochons, baking then washing and sanding off the acrylic paint, leaving thus a surface that looks fairly realistic.
1. Exceptional tutorial when it comes to the result. It even went for the brown and not so much black-looking matrix. The result does show realistic matrix that even has cloudiness. The only faults I would find to it is that considering the type of matrix that results from this technique it should have more faux rhyolite showing and also that she could have chosen a more "turquoise"-ish color.
2. Ludmila Bakulina's tutorial. She used precisely Tory Hughes' technique to which she added gold leaf. I find this tutorial very important for learning the "what" and "what not"s.
Watch carefully in the beginning when she shows the resulting faux turquoise pieces from the different brands of polymer clay.
The ones she made out of the big package of Fimo professional are close to super realism, but... she used gold. If she would have used a bronze or a mix of bronze and copper, and a brown instead of the black (and that can even pass as there are some stones that do have a black matrix or have been stabilized and dyed), these stones would have been very hard to distinguish from a real turquoise by sight only even for the connoisseur. Even using a single shade of clay, again, there are some stones that will not have variations
The Cernit ones on the other hand are the perfect example of how NOT to.
Very good lesson here: be very aware that different brands of clay will react differently with the media you're using for the matrix; they will also agglomerate and clump differently.
3. This one has good things and bad things.
Good things: uses brown also instead of black.
Bad things: uses mica-powder clay (pearl white) and glitter in the blue. Turquoise has no sparklies.
Warning: Using acrylic paint by itself will result in straight-line fine matrix, which is a no-no, as it doesn't really exist in natural turquoise. Even mixing the acrylic paint with liquid clay has to be done very carefully, and with "thickened out" liquid clay - or "thinned out" regular clay, however you want to call it, it's actually the consistency of thick mud that you get if you smush some clay and liquid clay together in equal parts - it's a messy, stinky result but it works. Use very little acrylic paint, just enough to give it color.
and the part 2 of it for the results. As you can see, not very realistic but the good idea is there.
4. This following one has chosen a perfect color for the matrix, very similar to the natural one, but again the mixing with paint strikes again.
For this amount of matrix shown, the matrix should be cloudy, not so precise, and a mix of big chunks and much smaller chunks would be expected. Look at the photos of real turquoises above.
Great choice of clay color as well. She actually uses one of the techniques Ludmila Bakulina has shown but with her own choice of matrix color paints.
Also, another problem - and that is valid for other tutorials, too - the pieces must not be with straight edges. Turquoise comes in "nuggets", that is, rounded (to a point - sorry no pun intended) so you must make sure that your pieces do not have straight angle corners and straight line defined edges. At least not for the nugget-type ones. The "boulder" might get that, but then the matrix in a boulder turquoise is very different, and the turquoise part too.
5. Now a tutorial that I am afraid is a complete fail. Can you see why?
6. This following tutorial is very interesting and shows that one shouldn't throw out the baby with the water.
The acrylic paint CAN work, but not with the "clump your pieces together, shape them and bake" technique.
This lady actually makes a veneer out of the unbaked clay, that looks absolutely great!
If she would have used brown instead of black, especially for that color of clay, her result would have been close to perfect.
I also like how she got on some pieces the "dirty turquoise" look where fine microscopic grains of turquoise are mixed in the matrix giving the "dirty blue" color.
To note that, with this one, considering that she used a green turquoise color, the gold part is fine. But don't ever EVER use nail polish on polymer clay. There are some UV nail gels that work, but if you don't know if they do, don't risk it. Anyway. This looks almost like Nevada green turquoises or some of the pieces from Mexico.
7. Now Sydney Holt. She's usually awesome but this tutorial... no. Just no. The only thing resembling a turquoise is the color.
I will stop here with the examples. Hopefully soon I'll be able to make the tutorial and show most of the types of turquoises.
P.S. To answer some of your private questions: Even if I'm not an expert in gemology and I don't have an academic degree on it, I know quite a bit about gems. I've spent over 3 decades buying and selling them, and especially when it comes to turquoises, I was fortunate enough to learn a lot from several Native American silversmiths. Native American silver jewelry has a special place in my heart. Maybe one day I'll make a tutorial on how to make Native-American inspired faux silver/turquoise jewelry. Slapping together silver polymer clay and a faux turquoise, even with pretty textures and nice shape is not all that is to it. You must know and understand the spiritual part of it, what each decorative element means and what is the spiritual intent behind each piece.
I put this together with the sole intent to make you understand what are the differences in various types of turquoises, so you will be able to achieve good results when you try to imitate a turquoise.
Friday, May 12, 2017
Sunny with a chance of polymer claying
Just kidding. Well not kidding actually, stating facts.
I usually - and when I say usually it means that unless we have tornadic storms, subfreezing temperatures or horribly sick days, it happens - me and my best friend have to quench our "fix". That is treasure hunting at Goodwill (and sometimes other second hand stores or flea markets).
Sometimes we do it on Saturday, sometimes on Sunday. This week-end today is the day.
I'll stop by Hobby Lobby to get my black thick jump rings and some more polymer clay. I think I might try a faux turquoise tutorial, even if there are so many out there. One more doesn't hurt now does it.
I was also looking at the Tuareg tribal jewelry. "Tuareg". the word in itself raises in my mind fantasy lands with lots of mysteries. That is because I was in my early teens when I read "Atlantida" by Pierre Benoit. If you didn't read it, go look for it. It's worth it.
Anyway, I started being fascinated by their jewelry. I might make some pieces inspired by it. I need to look more into their symbolistic.
So, talk to you tomorrow. Until then, here's my new tutorial.
I usually - and when I say usually it means that unless we have tornadic storms, subfreezing temperatures or horribly sick days, it happens - me and my best friend have to quench our "fix". That is treasure hunting at Goodwill (and sometimes other second hand stores or flea markets).
Sometimes we do it on Saturday, sometimes on Sunday. This week-end today is the day.
I'll stop by Hobby Lobby to get my black thick jump rings and some more polymer clay. I think I might try a faux turquoise tutorial, even if there are so many out there. One more doesn't hurt now does it.
I was also looking at the Tuareg tribal jewelry. "Tuareg". the word in itself raises in my mind fantasy lands with lots of mysteries. That is because I was in my early teens when I read "Atlantida" by Pierre Benoit. If you didn't read it, go look for it. It's worth it.
Anyway, I started being fascinated by their jewelry. I might make some pieces inspired by it. I need to look more into their symbolistic.
So, talk to you tomorrow. Until then, here's my new tutorial.
First tutorial
I'm late again. So yes, yesterday I spent all day long making tutorial videos.
First setback - I couldn't find an LED desk lamp. I used to have one, and threw it away like an idiot. Now you can't find them anymore - they used to be around $10. The cheapest you can find now are $20. Also, swivel adjustable arm lamps are now over $35 - and those are the regular lightbulb ones.
The nice LED ones are over $80. So I will have to come up with some kind of rigging for that.
Second setback - well not really a setback, as I managed to do a temporary thing - was with rigging the camera so it would show just my hands and work space close up. Well, did that.
Then after I taped the first clip, when trying to tape the next one, had the nasty surprise to find out that the "free" video capture software I had downloaded was not free, was free for only an hour. So I had to look for and install another one. Couldn't use the built-in camera capture of Windows 8 due to poor frame rate.
Installed the second software and only after I had taped everything, when I started editing, I realized I had chosen a wrong type of file that doesn't work in Movie Maker. So I had to "translate" everything in AVI and of course some quality got lost in translation.
Well I did finish everything though. Not the quality I wanted, but it will work for starters. It's uploading on youtube as I'm typing this. 11% done. So probably it will take another couple hours to finish as the final video came up about 47 minutes long. I need to just stop talking and caption everything, so the videos are shorter and will take less time to process and upload.
So here we go
In the meantime, meet my fuzzy cat Conor. I had to make him part of my tutorials. You'll see him in the end of the video. Yes, he does sit like that. He also loves to have his belly rubbed. I mean, really loves it, not like other cats who just entice you so they can grab and scratch and bite you.

First setback - I couldn't find an LED desk lamp. I used to have one, and threw it away like an idiot. Now you can't find them anymore - they used to be around $10. The cheapest you can find now are $20. Also, swivel adjustable arm lamps are now over $35 - and those are the regular lightbulb ones.
The nice LED ones are over $80. So I will have to come up with some kind of rigging for that.
Second setback - well not really a setback, as I managed to do a temporary thing - was with rigging the camera so it would show just my hands and work space close up. Well, did that.
Then after I taped the first clip, when trying to tape the next one, had the nasty surprise to find out that the "free" video capture software I had downloaded was not free, was free for only an hour. So I had to look for and install another one. Couldn't use the built-in camera capture of Windows 8 due to poor frame rate.
Installed the second software and only after I had taped everything, when I started editing, I realized I had chosen a wrong type of file that doesn't work in Movie Maker. So I had to "translate" everything in AVI and of course some quality got lost in translation.
Well I did finish everything though. Not the quality I wanted, but it will work for starters. It's uploading on youtube as I'm typing this. 11% done. So probably it will take another couple hours to finish as the final video came up about 47 minutes long. I need to just stop talking and caption everything, so the videos are shorter and will take less time to process and upload.
So here we go
In the meantime, meet my fuzzy cat Conor. I had to make him part of my tutorials. You'll see him in the end of the video. Yes, he does sit like that. He also loves to have his belly rubbed. I mean, really loves it, not like other cats who just entice you so they can grab and scratch and bite you.
Mosaic in polymer clay
Well all this has a history.
A few days ago I had a vision of tropical beaches and flowers and I started creating a cane with all tropical colors in order to make a necklace.
When I was done, of course, I had a lot of leftover clay. It usually happens with canes. So I started putting it through the pasta machine in order to mix it and add it to the scrap clay pile.
Only that when the first sheet of it came out of the pasta machine, the swirl of colors was so beautiful that I couldn't bring myself to just junk it. But it was also too simplistic to make something out of it "as is". So I tried the bargello technique. The effect was so stunning that I made quite a few pieces out of all that scrap clay. Pendants, necklace beads, even ear rings.
It looks about like this:

If you don't know what the bargello technique is, I can recommend to you a very neat tutorial on youtube. It belongs to Gayle Thompson - and she has quite a few awesome tutorials. The bargello is something that can help you really get rid in a creative way of all that scrap polymer clay.
So anyway. I was almost done with these and I kept mulling over and over how to use this more - the mosaic-like texture of the pieces looked really intriguing. But on the other hand, it would be a Sisiphus work to place each 1 square mm piece one by one to create a design.
So I started looking for ancient mosaic art. I found a flower - well it had 4 petals, at least I think it was a flower not a four-leaf clover. As I kept looking at it I realized that I can create a color pattern with bargello then cut crosswise and then cut the shape of what I wanted. So this is how the flower came out - I've set it in a round medallion shape.
I think some kind of antique bronze setting will fit this piece - I actually made two and still have some scrap. Maybe I'll make a tutorial later.
Yes, I bake on a vase. I went and ransacked the local Goodwill store for things I could bake on, that would give me nice shapes and that could fit in my small electric convection oven.
I do like to bake things on a convex base. It makes them pop out a little bit without having to use a lot of polymer clay base. It also makes it possible to add an invisible bail in the back.
A few days ago I had a vision of tropical beaches and flowers and I started creating a cane with all tropical colors in order to make a necklace.
When I was done, of course, I had a lot of leftover clay. It usually happens with canes. So I started putting it through the pasta machine in order to mix it and add it to the scrap clay pile.
Only that when the first sheet of it came out of the pasta machine, the swirl of colors was so beautiful that I couldn't bring myself to just junk it. But it was also too simplistic to make something out of it "as is". So I tried the bargello technique. The effect was so stunning that I made quite a few pieces out of all that scrap clay. Pendants, necklace beads, even ear rings.
It looks about like this:

If you don't know what the bargello technique is, I can recommend to you a very neat tutorial on youtube. It belongs to Gayle Thompson - and she has quite a few awesome tutorials. The bargello is something that can help you really get rid in a creative way of all that scrap polymer clay.
So anyway. I was almost done with these and I kept mulling over and over how to use this more - the mosaic-like texture of the pieces looked really intriguing. But on the other hand, it would be a Sisiphus work to place each 1 square mm piece one by one to create a design.
So I started looking for ancient mosaic art. I found a flower - well it had 4 petals, at least I think it was a flower not a four-leaf clover. As I kept looking at it I realized that I can create a color pattern with bargello then cut crosswise and then cut the shape of what I wanted. So this is how the flower came out - I've set it in a round medallion shape.

I think some kind of antique bronze setting will fit this piece - I actually made two and still have some scrap. Maybe I'll make a tutorial later.
Yes, I bake on a vase. I went and ransacked the local Goodwill store for things I could bake on, that would give me nice shapes and that could fit in my small electric convection oven.
I do like to bake things on a convex base. It makes them pop out a little bit without having to use a lot of polymer clay base. It also makes it possible to add an invisible bail in the back.
Subscribe to:
Posts (Atom)